Hey everyone! Thought I’d mix it up again for this week and turn to YouTube again – hope you guys enjoy this one as much as the blogs!
Stay tuned for next week!
– Taklon
pursuing a passion in graphics, animation, game design and development…
Hey everyone! Thought I’d mix it up again for this week and turn to YouTube again – hope you guys enjoy this one as much as the blogs!
Stay tuned for next week!
– Taklon
Hello everyone! Today, I will complete the last lecture on “Enemies” in the 3D Platformer Course. Last week, we finished implementing the enemy skeleton’s attack, allowing it to deal damage to the player. However, on the other hand, the player is currently unable to defeat the skeleton.
In many 3D platformers, one of the primary ways for the player to defeat enemies is to jump on them. Primitive, I know, but functionally useful so it makes sense to learn how to do this! Thus, this will be the main focus of today’s blog post.
To implement the player’s ability to attack by jumping, two hitboxes are created. The first hitbox is located at the top of the enemy skeleton’s head:

The second hitbox, named “Enemy Hurtbox”, is created and positioned at the player robot’s feet. Here, a rigidbody component is further added to it, allowing this hitbox to interact with the skeleton’s hitbox:

A new script named, “HurtEnemy”, is then created and attached to the “Enemy Hurtbox” on the player:

Another new script named, “EnemyHealthManager”, is created and attached to the skeleton. This script contains a function called, “TakeDamage()”, which is called by the “HurtEnemy” script created prior:

When the game is played, we can see that the enemy skeleton disappears as soon as the player jumps on its head:

In order to improve the aesthetic of the skeleton’s death, three things are done: playing a death sound effect, making the player bounce up after landing on the skeleton’s head, and leaving behind a particle effect. Implementing the above makes sense as we have learned how to do all these things before: playing a sound effect when collecting a pickup back in weekly blog #13, adding a knockback to the player when taking damage in weekly blog #8, and leaving behind a particle effect when the player is killed in weekly blog #10.
To create the bounce-up effect, a simple function similar to the player knockback is added to the “PlayerController” script:

Next, the “EnemyHealthManager” script is updated to call the “Bounce()” function. In addition, two simple lines of code generate the enemy death sound effect and particle effect:

By tweaking the player’s death particle effect and applying it to the skeleton, we can see that the player’s jumping attack on the skeleton is now much more interesting than before:

Last but not least, to reward the player for successfully jumping on and killing an enemy, a new coin prefab (a silver coin) is first created from the coin added earlier in weekly blog #12. The “EnemyHealthManager” script is then updated in order to instantiate the silver coin appropriately:

Lo’ and behold, here is the in-game result for killing an enemy skeleton:

That’s it for today’s blog post – which also wraps up the course section on “Enemies” in the course. Believe it or not, today is a major milestone in the course as we have all the game assets necessary now to start making actual levels/stages! No more mock game scene, woot woot!
Indeed, the next section of the course will look at designing levels – no doubt, I will get a chance to design my first level for a 3D platformer! I’m very excited about this… Stay tuned!
– Taklon
Hey everyone! I apologize as it’s been nearly a month since my last blog post – I have simply been preoccupied with things other than game development. But, the important thing is that I still intend on completing the 3D platformer course by the end of this year. As 2020 unwinds, I have to put a bit more of my spare time into the course over the next few months. With that, let’s jump right into Unity and continue where we left off with our enemy skeleton.
After setting up the AI states for the enemy skeleton earlier, one final thing that needs to be done is to return the enemy skeleton to its patrolling state when it’s in the attacking or chasing state and the player is no longer within attacking or chasing range:

Behold, the fully-implemented AI states of our enemy skeleton in the game:

Next, we will create a hitbox for the enemy skeleton’s attack. A hitbox is an invisible, defined area whereby damage is incurred. In this case, a damage hitbox is added and activated in the skeleton’s attack animation (as soon as the skeleton begins to attack) and deactivated when the skeleton completes its attack. If the player is inside the hitbox, damage is done to the player (via the “Hurt Player” script which was created earlier when the player health system was implemented):


Let’s now see the skeleton’s attack causing damage to our player in the game:

That’s it for this week’s blog! I hope you enjoyed the read. Next time, we will implement a way to allow the player to kill the enemy skeleton. It wouldn’t really be fair otherwise, right? 😉 Upon killing the skeleton, this would further spawn coins for the player to collect! Stay tuned!
– Taklon
Hello everyone! Unfortunately, for this week, I was not able to make any progress in the 3D Platformer Course, and thus, have nothing to share today on it. 😦 However, rest assured – after recently passing the halfway point in the course, I should and will continue to aim to complete it by the end of the year.
So instead, for today’s blog, I thought I’d share with some of you my thoughts on… Virtual Reality (VR). Yes, kind of random, but still quite relevant to my blog and I’ll further explain later. You see, I’ve been skeptical about VR technology for some time, albeit quite intrigued about it in recent years.
In the past few weeks, my curiosity eventually led me to purchase and pick up a VR headset today, the Oculus Quest. I must say, the technology is indeed rather revolutionary with its capabilities and it is by no means considered “new” technology anymore; there is now a fair amount of VR content out there for the consumer who is able to afford it.
Growing up, I’ve always to some extent felt immersed in any and whatever game I was playing (the SNES is still my favourite console to this day, but I digress…). After all, gameplay was and is still what matters the most to me. Still, with modern games of today, I cannot help but notice more and more the unimaginably realistic (3D) graphics and physics. In turn, these are factors that also begin to matter more and more to me naturally – and I can especially understand and appreciate this from the perspective of VR gaming now.
I guess what I am trying to get to is, as VR technology continues to advance, could it one day overtake what may then be considered as “traditional” (for lack of a better word) console and handheld devices to become the “new norm” for video games? As a game designer/developer with any insight to the future, this is perhaps something worth pondering over…..
Hello everyone. So, WordPress has released an update recently and it’s absolutely driving me nuts. Basically, I’m forced to use their “block” editor now without the means to revert to the “classic” editor. And to put it bluntly, the block editor absolutely sucks – I can’t do certain things as easily as I used to and have given up trying after spending far too much time in it. Anyway, I will continue to stick with WordPress for now (at least until I’m finished the 3D Platformer course), but there’s a good chance I might look to a different way of sharing my work down the road… Vlogging perhaps? 🙂
Alright, so continuing where I left off last week, I will update the skeleton enemy AI today by adding additional AI states for it. No doubt, today’s post will be a little heavier on the coding side. Of course, if the coding is too much to digest, feel free to just skip to the end to see the result in the game.
Last week, in the “EnemyController” script for the enemy skeleton, the enumerated (enum) type variable was introduced (which we named “currentState”). This was used to store multiple values or states for the enemy AI. For example, the “isPatrolling” and “isIdle” states were set up such that, in their respective states, the skeleton would either be moving along a fixed path or be stopped at a patrol point along that path. Today, two additional states will be added: “isChasing” (to allow the skeleton to chase after the player when the player is close to the enemy) and “isAttacking” (to allow the skeleton to attack the enemy as long as the player is within attacking range):


And to see the skeleton’s AI behaviour in the game now, let’s take a look when the game is run:

Alright, that’s it for today’s blog – a short one, I know (to be honest, the WordPress update kind of killed my enthusiasm). Next week, I will finish updating the skeleton’s AI since, at the moment, it does not return to its chasing or patrolling states when in the attacking state. I will also make the skeleton’s attack do damage and allow the player to hurt and kill it as well. Stay tuned!
– Taklon
Good evening, everyone! After taking a break last week, I’m back this week to continue blogging my progress in the 3D Platformer course. Admittedly, I haven’t made much further progress as work has been (again or as usual now?) quite hectic. Nevertheless, today, I will be showing how to add an enemy skeleton to the game and setting up animation and basic AI movement for it.
Once an enemy skeleton model is added to the mock level/scene, the “NavMesh Building Components” for Unity are downloaded and imported into the Unity project (note that these components are separate files that are not built into Unity but are downloaded on github and imported into Unity):

Essentially, the NavMesh components allow us to easily implement AI behaviours for an enemy object. Before working on the enemy object, however, the ground is first selected and a NavMesh is generated or baked (the light-blue shaded area represents the NavMesh or area that is “walkable”):

Next, a NavMeshAgent component is added to the skeleton object, which allows it navigate the game scene/environment using the NavMesh that was generated. The NavMeshAgent also grants a whole suite of parameters to control everything from movement or steering (i.e.- speed, acceleration, etc..) to obstacle avoidance and path finding. For now, the default parameters for the NavMeshAgent will suffice. And with that, four patrol points for the skeleton are added to the scene (which serve as destination points for the skeleton to walk to one-by-one):

In order to setup the enemy movement (as we did with creating a “PlayerController” script for the player character at the start of this blog series), an “EnemyController” script is created for the skeleton:
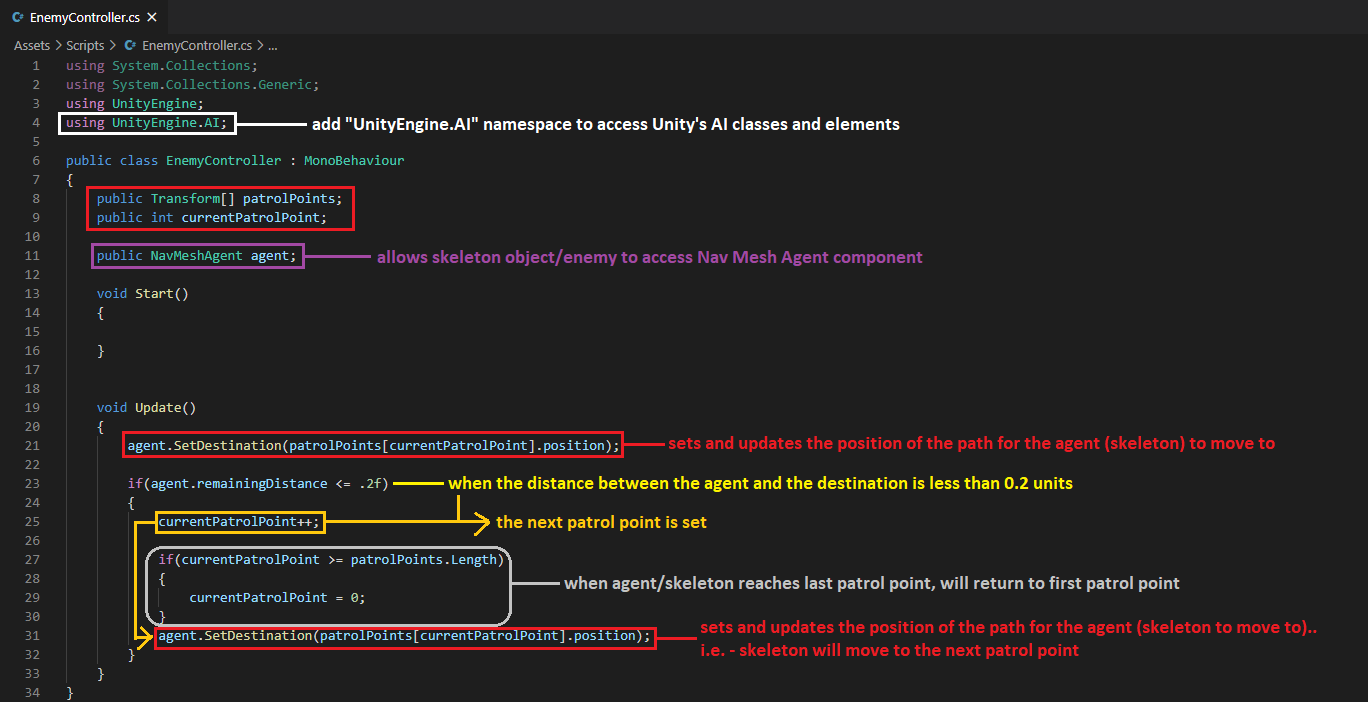
In the script above, the patrolPoints array is of a type “Transform” which stores the position of each element in the array, or in this case, the positions/coordinates for each of the four patrol points added to the scene. Thus, the script above produces the following result when the game is run:

Now, with the enemy animations, these are set up a bit differently than the player animations. The enemy animation will be largely “state-based” to allow for implementation of state-based AI through scripting. In other words, the coding in the script will be able to dictate what state the enemy is in: attack, idle, or running:

As you can see above for the enemy controller animator, the idle and running states are set up the same way as the player controller animator; that is, exit time is enabled and fixed duration is disabled. However, for the attack transition (from any state to attack) and attack to idle transition, exit time is disabled here while a fixed duration is assigned. This is because the attack state will eventually be dictated by the script (which I will learn and cover in the next blog). Hence, the ‘Attack’ parameter added is of a type ‘Trigger‘ instead (opposed to the float and bool parameters which were utilized before).
After setting up the skeleton animator, the enemy controller script is updated:


Essentially, what is happening in the script above is that the enemy skeleton is constantly switching back and forth between its ‘isIdle’ and ‘isPatrolling’ AI states. In the ‘isIdle’ state, the ‘Idle’ state is active (and the idle animation is played). In the ‘isPatrolling’ state, the ‘Running’ state is active (and the running animation is played):

Alrighty, it’s getting super late now and I’m glad I was able to get this blog posted in time! Next week, I will set up the skeleton’s attack animation and improve its AI – for example, chasing and attacking the player when the player is nearby. Thanks for reading and stay tuned for the next blog post!
– Taklon
Howdy everyone! Today, I will continue where I left off last week in the 3D Platformer Udemy course and create the options menu for the pause screen. The options menu will basically allow the player to adjust the game’s music and sfx volume (which were implemented two weeks ago).
To create an options menu, the first step is to add a panel, “Options Panel”, to the “PauseScreen” panel. Here, another new UI element is introduced and added: the slider. A slider is an object which contains background, fill area, and handle slide area objects (as the children); each of these contain components that allow an image and/or colour to be assigned to it:

Before diving into the scripts, there is one thing that needs to be done in Unity’s Audio Mixer window. If you recall way back when we had set up various animations for our player, we were introduced to an “exposed” parameter (i.e.- “Speed” for our character). In Unity however, some parameters are by default, unexposed. For example, the volume parameter in Unity’s audio mixer is unexposed. As such, in order to refer in our scripts to the volume parameters for the Music and SFX audio mixers, they need to be exposed and renamed:

Next, the “UIManager” script is updated:

And then the “AudioManager” script is updated:

Before running the game, the course instructor also shows how to add a skybox and use it as a part of the lighting for the game environment/scene:

The skybox addition is kind of a random addition, although I do recall adding a skybox in Blender before, which could really make a scene pop and stand out more! I think it also adds a bit of a realistic look to the game, wouldn’t you agree?
So it’s nearly the end of July now… As I look at the progress bar for the course, it looks like I am right at the halfway point (53 out of 108 lectures). Realistically, at this rate, I will likely finish the course at the end of the year (rather than in the Fall which I originally anticipated). I think this is fine! Looks like 2020 will be primarily about learning game development and the start of 2021 will be when I begin to design my own, original 3D platformer.
In the meantime, I hope you guys are enjoying and will continue to enjoy reading these blogs on my learning process in 2020! Next week should get more interesting as we move away from UI elements again and start learning how to add enemies to the game! Super excited for this!
– Taklon
It’s late Sunday evening as I find myself scrambling now to get this blog post published. This past week has been super busy (busier) at work. As exhausted as I have been, I contemplated on skipping this week’s blog. However, realizing that August is right around the corner, I managed to get something done in the course for this week anyhow. Today, I will add a pause menu to the 3D platformer with a button that will allow for the player to resume the game.
To create a pause menu, the first step is to create a panel (UI object), “PauseScreen”, under the UI Canvas. The colour of the panel is set to black with a ~50% opacity/level on the alpha channel:

Next, another new UI object is introduced. Here, a button (UI object) for the “ResumeButton” is added with different sprites/images assigned to the Source Image, Highlighted Sprite, and Pressed Sprite. The button is duplicated several times with the text changed for the remaining buttons: “OptionsButton”, “LevelSelectButton”, and “MainMenuButton”:

After, the ‘UIManager’ script is updated:

And to set up the “PauseUnpause()” function in the ‘GameManager’ script:

A very interesting and noteworthy line of code in the ‘GameManager’ script above is “Time.timeScale“. By setting “Time.timeScale” to ‘1f’, the game runs at regular/normal speed. If it is set to ‘0.5f’, the game runs at half speed. Thus, setting it to ‘0f’ effectively pauses the game. I imagine this may be used to create some pretty cool slowdown/slow motion effects… but I’ll play around with this later probably!
Finally, let’s see what the pause menu looks like in the game:
Pretty simple, wouldn’t you agree? Next week, I shall learn to complete the rest of the buttons for the options, level select, and main menu for the pause screen. Stay tuned!
– Taklon
Hello, I hope everyone is doing well. As a recap, over the last three months, I have learned how to set up a mock level or game scene for a 3D platformer by creating: player and character movement, player health system (including death and respawn), checkpoints, health object pickup, and collectible items. Today, I will set up and add background music to the game along with sound effects (sfx) for some of the objects.
As a preface, setting up the music and sfx system in Unity is actually a tad more complicated than I expected. If there is more than one music track and sound effect in the game (which is often the case), a script will actually need to be used. Thus, to begin with, the ‘AudioManager‘ script is created:

Once the ‘AudioManager’ script is created, it is attached to the “Systems Manager” in Unity. Fortunately, the rest of the work is fairly intuitive. Next, the music and sfx files are dragged into or assigned to their respective arrays:

Each ‘Music Source’ or ‘SFX Source’ added to the scene has its own Audio Source component. Here, various parameters (such as volume and pitch) can be adjusted for each individual music track or sound effect:
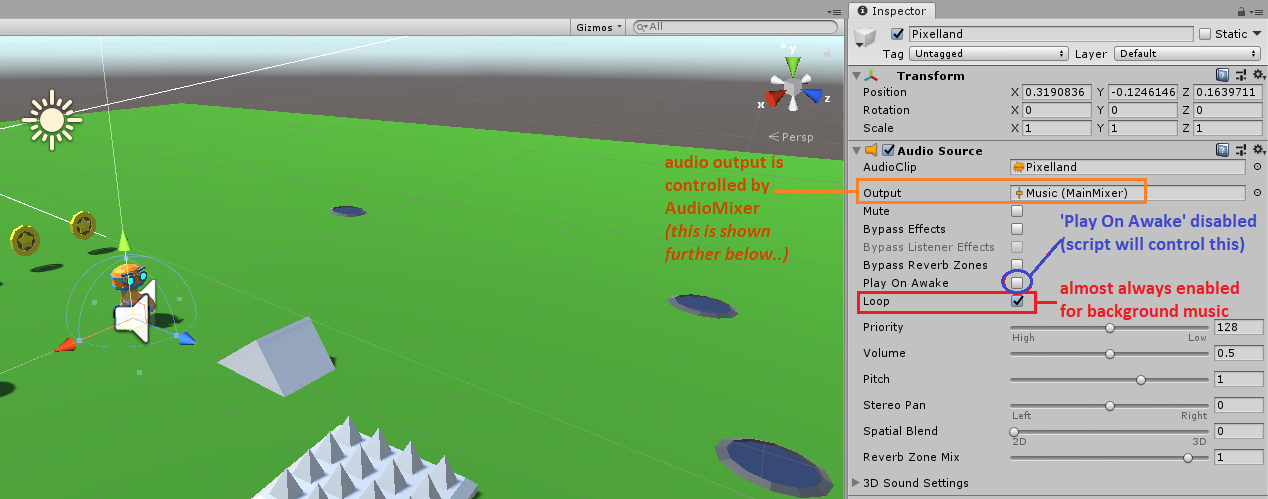
However, there is often an additional need to control the overall volume or audio output for all music and sfx in the game as well (rather than just individual tracks and sfx). This can be done by adding an AudioMixer in Unity:

Finally, to assign a sound effect to an object, the ‘PlaySFX()’ function in the AudioManager is called wherever appropriate (from other scripts). For example, in the ‘CoinPickup’ script:

The appropriate sfx array element is then assigned to the game object/prefab:

At long last, we now have something aesthetically pleasing to the ears as well! It really makes you think how much more enjoyable having music and sound effects are in a game, doesn’t it?
And with that, it looks like the next topic in the course is to add a pause menu to the game with perhaps the ability to control some of the game settings. Thanks for reading today’s blog post and do stay tuned for next week’s!
– Taklon
Greetings! It has now been 3 whole months since I started my 3D platformer game development blog series! Despite some very busy work days and overtime lately in my full-time job, I feel especially proud in being able to keep up with the 3D Platformer course in my spare time, and of course, my commitment to blogging my progress in it every week.
Today, I will finish setting up the mock level (or game scene) by adding just one more pickup object to it before moving onto implementing other elements in the game such as the music, sound effects, and menu screen.
So just what is this shiny, new pickup item that will be added? No doubt, this will be a coin that the player can collect and see how many are in possession! Adding the coin is done in pretty much the same way the heart pickup was added and player health UI implemented in the last two weeks – so feel free to look back at Week #10 and #11 first if you haven’t already!
Before adding the coin to the scene (which will be done last this time), the first thing is to set up the UI to keep track of the number of coins the player has collected. To do this quickly, the ‘HealthImage’ and ‘HealthText’ UI objects in the canvas are duplicated and renamed for the ‘CoinImage’ and ‘CoinText’:

And in the ‘UIManager’ script again, a proper variable is declared to keep track of the player’s coins:


Next, a ‘CoinPickup’ script is created for any coin objects that will be added to the scene:

A coin is then added to the game scene with a collider component, the ‘CoinPickup’ script attached, the coin value assigned, and a unique particle effect created and assigned to it. The coin is then duplicated several times:

Alas, an animation will be added to make the coin spin. Luckily, the process of doing this is quite intuitive as the animation timeline and tools in Unity resemble very much like the ones in Flash and Blender (which I have had some experience doing animation in before):

Taking a closer look at the timeline, the animation slider can be dragged back and forth in the timeline to see the animation play out:

Before running the game, I decided to add another animation for the heart pickup created earlier. Now, let’s see how the animations look in the game!

That’s it for this week’s blog – I hope you enjoyed the read! As I mentioned, next week, I’ll be moving onto other aspects of the game: music, sound effects, and a menu screen. I’m quite excited for this – do stay tuned!
– Taklon
